Thursday, April 11, 2019

Rava Sandwich(sooji toast) Recipe


Rava sandwich(sooji toast) is a perfect snack item to serve in the morning breakfast or as an afternoon tea time snack. The process of making this toast is very simple and takes no more than 15-20 minutes.
Ingredients
You just need rava (sooji), capsicum, tomato, onion, curd.
Method
Mix all the ingredients except bread to make rava-veggie mixture and then spread this mixture on bread slices and shallow fry them until golden brown and crisp to make rava toast. Make this simple toast at home by following the given step by step recipe and enjoy it in the morning breakfast.


Preparation Time:  10 minutes
Cooking Time: 10 minutes
Serves: 2 serving

Ingredients:
4 Bread Slices
1/4 cup Rava (sooji/semolina)
2 tablespoons finely chopped Capsicum
2 tablespoons finely chopped Tomato
2 tablespoons finely chopped Onion
1/2 Green Chilli, finely chopped
2 tablespoons Curd (plain yogurt) or Malai or Cream
1-2 tablespoons Oil
Salt to taste
step-1step-2
  1. Direction: 

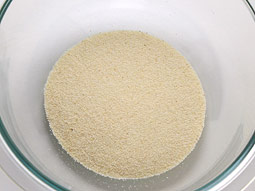
      • Take 1/4 cup Rava in a medium bowl.

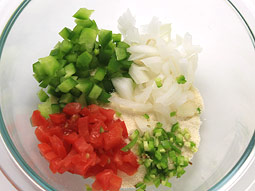
    1. Add 2 tablespoons finely chopped capsicum, 2 tablespoons finely chopped tomato, 2 tablespoons finely chopped onion and 1/2 finely chopped green chilli.

    2. Add 2 tablespoons curd (plain yogurt) and salt.

    3. Mix all ingredients properly using a spoon. Don’t add any water. Rava toast rava-veggie mixture put in bowl evenly on each .bake the mixture and after bake the toast cut in the middle equal size slice. the mixture fills into both slices.
    4. Heat 1/2-1teaspoon oil for eachRava slice tava over medium flame.
    5. Cook another side on low flame until it turns crispy and golden brown in color (as shown in the photo). Flip it. Don’t cook it on medium flame else the rava slice golden brown fast but remains soft. transfer shallow fried rava slice a plate. Rava toasts are ready for serving. Cut them into desired shapes and serve immediately with tomato ketchup and a cup of hot tea/coffee.


  • Friday, November 2, 2018


    BREAD NAAN
    Bread Naan

       Ingredients:-

    • 3 to 4 c. all-purpose flour
    • 1 tsp. salt
    • 1/2 tsp. instant yeast
    • 1 1/4 c. milk
    • 1/4 c. plain Greek yogurt
    • 1 tsp. sugar
    • 1/8 tsp. ground cardamom
    • 1/8 tsp. ground turmeric
    • 4 Tbsp. melted Ghee or butter

      The method   
      you’re just mixing the dough, letting it sit (for 2 hours), roll the dough into 12 balls, let it sit for another 30 minutes, then roll the balls into ovals and bake them in the oven. It’s really not that complicated, yet somehow I build it up in my head to be this day-long baking extravaganza.

      Instructions
    • Pour the milk into a liquid measuring cup, whisk in the home yogurt, and heat in the microwave until warm to the touch (about 110 degrees F). Pour the warm milk into a large bowl or the bowl of an electric stand mixer. Add the sugar, instant yeast, salt, cardamom, turmeric, and 2 1/2 cups of the flour.
    • Mix well with a wooden spoon or the paddle attachment on your stand mixer. Continue adding flour gradually in small amounts, until a soft dough is formed that cleans the sides of the bowl (it will still be sticky). Knead the dough using the dough attachment on your stand mixer, or by hand until it is smooth and elastic, about 3-5 minutes in the mixer or 10 minutes by hand.
    • Place the dough in a lightly greased bowl and let it rest at room temperature, covered lightly, for about 2 hours.
    • After the dough has rested, turn it onto a lightly floured surface and divide the dough into 12 equal pieces, rounding each into a ball shape. The dough will still be a little sticky, but you won't have too much trouble forming it into balls.
    • Cover the pieces with a towel and let them rest for 30 minutes. While the dough rests, preheat your oven to 500 degrees Fahrenheit and place a pizza stone or large cast iron pan on the bottom rack of the oven.
    • Once the dough has rested for a half hour, one by one, roll each piece into a circle about 6 inches wide. Open up the oven and lay the circle of dough on the hot pizza stone. Spritz the top of the dough with a little water or olive oil. Close the oven and bake the naan for about 2-3 minutes, until it is lightly puffed and brown spots begin to appear on the bottom. Turn the naan using tongs and return to oven for another 2 minutes or so.
    • Remove the naan from the oven and place on a cooling rack or large plate. Brush lightly with Ghee or melted butter. Stack the hot naan on top of each other as it comes out of the oven to help keep the pieces warm.

    Wednesday, October 31, 2018


    Tips for kitchen design

    Today's kitchens are often the heart of the home. Therefore, careful planning is required to ensure a kitchen that's both beautiful and highly functional. Here are 20 tips to consider when designing your kitchen.

    1. Eliminate wasted steps. Think about how and where you use items. Store breakfast foods and bowls near the breakfast table. Keep wraps and plastic containers in one handy spot near a work surface for wrapping leftovers. Locate dishware and flatware near the dishwasher to ease the process of unloading.
    2. Design wide walkways. Paths throughout a kitchen should be at least 36 inches wide. Paths within the cooking zone should be 42 inches wide for a one-cook kitchen and 48 inches wide for a two-cook configuration. When planning, adjust kitchen islands and peninsulas accordingly.
    3. Direct traffic. For kid-friendly kitchen designs, keep the cooktop out of traffic areas so children don't catch handles and cause spills when running through. Also, make the refrigerator accessible to both passersby and people working in cooking and cleanup areas.
    4. Stay clear of corners. To make cabinet and appliance doors fully functional, plan space for the door's clearance and swing direction in your kitchen design. Keep appliances away from corners, and make sure doors won't bang into each other if open at the same time.
    5. Find the right height for the microwave. The correct height and location for a microwave oven may vary depending on the chef or the kid-friendly character of the kitchen. For adults, 15 inches above countertop level is a good microwave height. For kids, a below-countertop setup may be safer and more suitable.
    6. Determine the island's function. When it comes to kitchen islands, form follows function. If you want to cook and eat on kitchen islands, plan enough space so the cooktop is safely separated from the dining area.
    7. Plan landing space. When designing your kitchen, allow 15 inches of countertop on each side of a cooktop and refrigerator. Landing space is also important near the microwave.
    8. Consider the countertops. Chefs who like to cook require more counter space -- ideally between the range and sink -- than those who cook infrequently or who prepare simple meals. In addition, incorporating two countertop heights makes baking easier and helps kids who are involved in meal preparations.
    9. Double up. A second microwave oven and a mini refrigerator or refrigerator drawer positioned at the edge of the kitchen work center can keep snackers out of the cook's way. Add a snack bar with stools for an after-school spot for the kids.
    10. Arrange the range. Place a shelf beside or behind the range to keep cooking oils, utensils, and spices handy. Place S-hooks on the side of the range hood to hang frequently used pots and pans.
    11. Fill it up. Tired of lugging water-filled pots from the sink to the cooktop? A swing-out tap -- also called a pot-filler -- installed near the cooktop fills pots near where you heat them. Or you can install an extra-long hose attachment on your main faucet to fill pots on the cooktop.
    12. Be sharp when storing knives. Hang knives on a magnetic strip tacked to the backsplash. This makes it easy to spot the right knife for a job and keeps dangerous items out of children's reach.
    13. Make recycling easy. Equip a cabinet with separate containers for glass, plastic, and metal. A spare drawer could hold old newspapers.
    14. Think short. Put kids' favorite dishes and snack foods on shelves they can reach.
    15. Add a message center. Establish a message center near the kitchen telephone. Put a bulletin board, chalkboard, or whiteboard on the wall, and store a calendar, notebook, and writing utensils in a nearby drawer.